
Come on! We all have them. Maybe it's your husband, or a dad, brother or Uncle. My hubby is easy, he tells me what he wants for Christmas. However, my dad pretty much has everything he needs and one of my brother's is just hard to get any info out of. The other one...well, I can't afford him, ha! So, my dad and one of my brother's birthdays are just days apart from each other. I wanted to make them something that would mean something to them. I'm a
Has anyone ever seen this super cool tutorial?
Yep! You make coasters from old Comic Book Strips! Gasp!!, you say?! How dare you cut up a perfectly good comic book!! Chillax, it's all good. That adds to the authenticity of the coaster, in my opinion. And, the Vintage Comic Book belonged to my husband. My husband took great time and pleasure in being able to select the perfect scenes from his book for my brother. Plus, we got to work on it together! But, if you just cannot fathom the thought of a Collectible succumbing to death by scissors, then you can always have the pages copied. If you have them copied, make sure it's with a laser printer, NOT ink jet!
The tutorial is extremely easy to read and simple to follow
Yay for awesome tutorials!

Photo from: modgepodgerocksblog.com
You can buy Mod Podge at Walmart, or use your 40% off coupon from Michael's and get it from there.
You can get that coupon here
Following the tutorial, you will lightly sand the metal covers with a 220 fine grit sand paper, to allow the paint to adhere to it. Let it dry. We then picked out photos from the Comic book that we wanted to put on each Coaster. My husband took the metal plate and put the comic book photo over it to trace around it for the exact measurement. He then took an exacto knife to cut out each image, which did take a little bit of time. The original tutorial has an easier way to do it, if you have the tools available to you. We did not, so we improvised. :)
This is a very important next step, as we failed to do this for one of them, with disastrous results. Here is what their tutorial said to do:
"I like to dampen my images before attaching them as it reduces the bubbles and wrinkles that plagued me in my early Mod Podge attempts. NOTE: This method will NOT work with images printed on an ink jet printer as the ink will run - you should always test a little section of the paper to make sure it will hold up. I fill a container with water and drop the image in to soak a little while I prepare the surface.

Photo From: http://modpodgerocksblog.com
From the Original Tutorial: "when I pull the image out of the bath I run my fingers along either side of it to remove any excess water. After that I lay it on the surface and gently smooth it out, pushing out any air that gets trapped or any excess Mod Podge (having a paper towel handy is helpful) and allow it to dry.
!!STOP!! {Collaborate And Listen} Haha! I always think that when I hear !!STOP!! Okay, so when I was at this point of the Tutorial, I did not understand that the metal should have already had a base coat of Mod Podge on it. So, make sure that you do that before you place your photo onto the metal plate. You would then continue on with the directions above directions : "when I pull the image out of the bath I run my fingers along either side of it to remove any excess water. After that I lay it on the surface (metal plate that already has the bottom layer of Mod Podge on it) and gently smooth it out, pushing out any air that gets trapped or any excess Mod Podge (having a paper towel is handy).
The original tutorial continues on with "After about 20 minutes, I top coated the coasters with a layer of Mod Podge and allowed it to dry, then sanded it with my 220 grit sandpaper and gave it another coat." (of Mod Podge)
This is yet another critical mistake that we failed to do, thinking we didn't need to. And, when I did try to give it a light sand, the comic book photo would tear. I believe it ripped because it didn't have that bottom layer of Mod Podge to adhere to. Plus, we did not allow the Comic Book photo to dry completely first before putting the top layer of Mod Podge on. {Have I mentioned that I don't read directions, that I just kinda start and see if i'm doing it right}? I don't have time for directions man!
The last Coat, after being given a light sanding with 220 extra fine grit sandpaper.
Photo from: modgepodgerocksblogs.com
You are almost done!! The last step is to use the rubber gaskets that came with the metal covers. You can use E600 Glue to glue the gaskets onto the bottom of what now is your new Comic Book Coaster!

Photo from: modpodgerocksblog.com
Ta Da! Don't you love it how you are given a commentary of a tutorial, instead of a tutorial, haha?
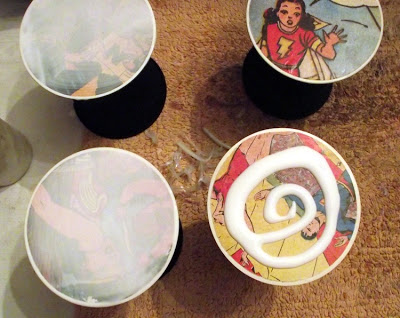
I wish I would have had the foresight to remember where my photos are of this process. But, you can see our end result:

I wish I could show you close ups!!! I wasn't thinking of a future blog post when I snapped these photos. :)
Lessons learned:
1. Definitely give each photo a little bath (we put ours in a small Tupperware container, filled it half way with water). We allowed it to soak for a few minutes.
2. Put a bottom layer of Mod Podge on the metal cover before the Comic Book Print is put on. You can use your fingers, or a foam brush. We then removed the photo and ran our fingers across the photo to remove excess water. Then, lay the picture on the surface of the plate, gently smoothing it out over the plate.
4. Allow to dry and then lightly sand before your top coat of Mod Podge is applied.
Our mistakes:
We lost 2 of the lovely coasters from not the following directions! I am one who will figure it out as I go, which usually leads to my having to re-do it all over again. So, do it the right way the first time by reading the instructions folks! ;)
They really are cute gifts and my hard to by for brother loved them! The other cool thing is that the whole family can help! It's inexpensive, only a little time consuming, and is super cool with the potential for family bonding time. Plus, you get to make a cool gift for someone who is very hard to shop for! Next, will be a tutorial of a photo transferred to wood DIY Gift.
So, what do you think? Has anyone tried a similar DIY gift idea? If so, how did it turn out?
Do you Dare me to try to make more? Following the whole Tutorial this time???


